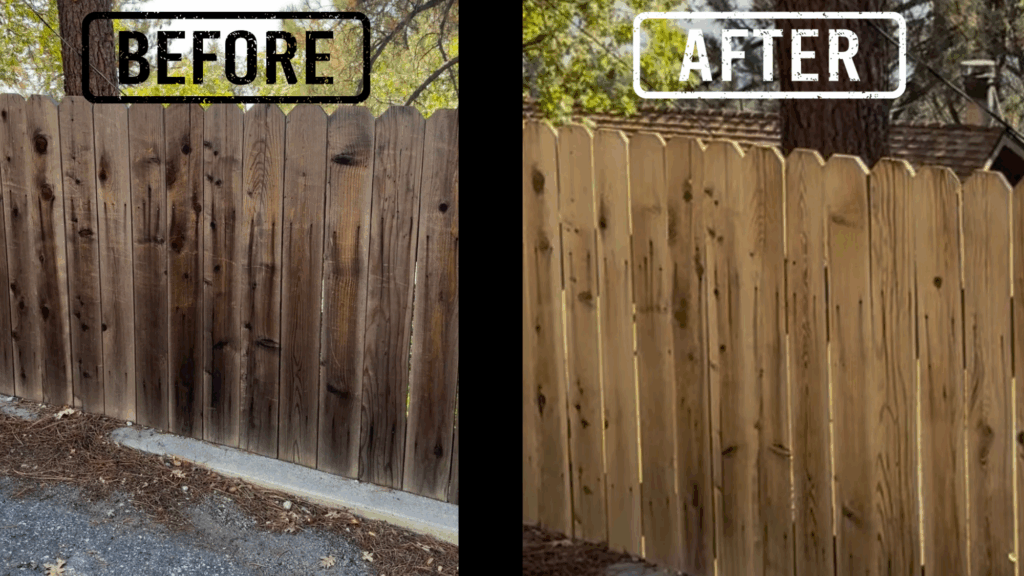
Cedar fences are beautiful, durable, and naturally resistant to rot, but over time, they weather to a dull gray color. If your fence has lost its light, warm cedar tone, there’s an easy solution: cleaning it with a bleach solution. In this guide, I’ll show you how to clean a cedar fence with bleach, step-by-step! Your fence will look refreshed and ready for staining or sealing.
This blog post is all about how to clean a cedar fence with bleach.
Affiliate links may be used in this blog post, at no cost to you.
Here’s Why You Can Clean a Cedar Fence with Bleach
Household bleach or liquid chlorine (sodium hypochlorite) is an effective oxidizer that removes surface mildew, algae, and the weathered gray layer on cedar. It brightens the wood by lifting oxidized lignin and dirt while leaving the underlying cedar tone intact.
Using a 50/50 water and bleach mixture in a pump sprayer is safe for the wood when done correctly and prevents the need for sanding or replacement. This is the exact bleach (chlorine) product I used.
Pro Tip: You can use a test patch on a small, inconspicuous area before treating the whole fence to ensure color and wood integrity.
What You’ll Need to Clean A Cedar Fence with Bleach
Materials & Tools (all from Walmart.com!)
- Liquid chlorine (10% sodium hypochlorite) or household bleach
- 2 gallon pump sprayer
- Stiff-bristle brush for scrubbing difficult areas
- Nitrile gloves
- Safety glasses
- N95 mask
- Exterior wood sealer or stain
- Paint/stain sprayer to apply wood sealer
- Garden hose with spray nozzle
- Plastic sheeting/tarps to protect nearby plants
- Long sleeves, long pants, and closed-toe shoes
- Water

Safety is critical: bleach is caustic. Avoid mixing with ammonia or acids, protect plants, and wear appropriate PPE. Also, ensure this product does not runoff into waterways; if this is a concern, you should manually sand or pressure wash your fence without using harmful chemicals.
Step-by-Step: How to Clean A Cedar Fence with Bleach
1. Prepare Your Fence and Surroundings
- Inspect the fence and identify any heavily weathered or stained areas that will need scrubbing after spraying.
- Cover nearby plants, shrubs, or delicate landscaping with plastic sheeting. Wet plants first to reduce chemical uptake.
- Protect metal hardware like nails and hinges with plastic or tape.
2. Mix the Bleach Solution
- In the pump sprayer, fill halfway with clean water.
- Add an equal volume of liquid chlorine (or household bleach) to create a 50/50 solution.
- Cap and gently agitate to mix.
Tip: Label your sprayer clearly and never reuse it with other chemicals.
3. Apply the Solution
- Spray the fence evenly top to bottom using overlapping vertical passes.
- Maintain a distance of 12–18 inches from the wood to prevent oversaturation.
- Allow the solution to dwell for 10–15 minutes — watch your test patch for results.
- For stubborn spots or mildew, gently scrub with a stiff-bristle brush while the solution is wet.
4. Rinse Thoroughly
- Use a garden hose to rinse the fence top to bottom until runoff is clear.
- Optional second pass: If the desired brightening effect is not achieved on the first pass, you can repeat the process. Apply the same solution, dwell time, scrubbing, and rinse procedure.
Important: Do not let bleach sit on the wood too long — it can over-brighten or damage fibers.
5. Dry and Finish
- Allow the fence to dry completely for 72 hours.
- Once dry, apply an exterior cedar sealer, or semi-transparent stain to protect the wood and slow re-weathering. This is the exact wood sealer I used.
Tip: Plan to reseal every 2–4 years for long-lasting color and protection.
Safety and Environmental Tips
- Never mix bleach with ammonia, vinegar, or acids — this creates toxic gases.
- Cover plants and avoid chemical runoff into flower beds, lawns, or waterways.
- Wear protective clothing: gloves, goggles, N95 mask, long sleeves, and closed-toe shoes.
- Keep children and pets away during and immediately after application.
- Work upwind of the fence so fumes drift away from you.
- Avoid inhaling directly over the spray.
- This method is effective, but it may not be the best choice for every fence or situation. Pressure washing or manually sanding avoids chemicals but can be more labor-intensive. Consider your environment, wood type, and personal comfort before choosing a method.
Alternatives to Bleach for Cleaning A Cedar Fence
- Oxygen bleach (sodium percarbonate): Gentler on plants, safe, but slower to lift gray wood.
- Wood brighteners (oxalic acid): Effective for stubborn tannin stains or uneven weathering.
- Low-pressure washing: Can refresh the fence but avoid high pressure that damages the wood fibers.
- Manually sanding: a time-consuming, labor-intensive, and messy process.
Frequently Asked Questions
Q: Can bleach damage cedar?
A: If used at the correct concentration and rinsed thoroughly, bleach will not harm the wood. Always test a small area first.
Q: How long before I can stain or seal the fence?
A: Wait 72 consecutive hours of moderate/warm and rain-free weather for the fence to dry completely.
Q: Is bleach the same as chlorine?
A: Household bleach is a diluted sodium hypochlorite solution, which is a chlorine compound. In other words, bleach contains chlorine, but it’s much safer than pure chlorine gas or industrial-strength solutions.
Q: Can this method be used on other wood fences?
A: Yes, the process works on most untreated or pressure-treated wood, but results may vary based on wood type and weathering.
Conclusion
Reviving a weathered cedar fence doesn’t have to be difficult or expensive. Using a 50/50 bleach and water solution in a pump sprayer is a simple, effective method that brings back the wood’s natural beauty. Follow these step-by-step instructions, take the proper safety precautions, and your fence will look fresh, bright, and ready for staining or sealing.
Catch more snippets of us using this treatment on our old cedar fence on Instagram!
Remember: If runoff into waterways is a concern, manual sanding or low-pressure washing may be a safer alternative. Always do your own due diligence to determine the best method for your fence and situation.
Is it time to replace your old or torn window screens? Do it yourself and save money in the process. Read my how-to blog post about DIY Window Screen Replacement.